ICS-PA日记-PA2
概况
本实验通过了所有 OJ 样例,实现了所有必做功能。
必答题备忘链接:
程序是个状态机-理解YEMU的执行过程
整理一条指令在 NEMU 中的执行过程
程序如何运行-理解打字小游戏如何运行
编译与链接 1
编译与链接 2
了解 Makefile
不停计算的机器
理解 YEMU 如何执行程序
理解 YEMU 如何执行程序
YEMU 可以看成是一个简化版的 NEMU, 它们的原理是相通的, 因此你需要理解 YEMU 是如何执行程序的. 具体地, 你需要
- 画出在 YEMU 上执行的加法程序的状态机
- 通过 RTFSC 理解 YEMU 如何执行一条指令
思考一下, 以上两者有什么联系?
画出在 YEMU 上执行的加法程序的状态机
在 YEMU 上执行的加法程序为:
1 | uint8_t M[NMEM] = { // 内存, 其中包含一个计算z = x + y的程序 |
状态机视角:状态由内存状态,寄存器(这里有四个)和 PC 唯一确定下来。
1 | # <pc ,<mem>, <regs>> |
通过 RTFSC 理解 YEMU 如何执行一条指令
YEMU 的 exec_once 函数是执行一条执行的函数。
具体来说,执行一条指令通过这几个步骤:
- 取指:
- 根据 PC 取指令,
this.inst = M[pc]
- 根据 PC 取指令,
- 译码
inst_t结构体是一个联合体:这很方便用同样组织的内存空间同时解读不同的指令类型。
1
2
3
4
5
typedef union {
struct { uint8_t rs : 2, rt : 2, op : 4; } rtype;
struct { uint8_t addr : 4 , op : 4; } mtype;
uint8_t inst;
} inst_t;- 然后译码通过
switch语句完成 - 操作码:不同的 case 有不同的二进制数,匹配着不同指令的操作码部分(这里是前 4 位代表)。操作码也同时表示了是
M-type还是R-type, 保证不同的处理规则。 - 操作数:操作数的获取也是通过联合体的不同内存位置获取的
#define DECODE_R(inst) uint8_t rt = (inst).rtype.rt, rs=(inst).rtype.rs- 这是一个带参数的宏。
未识别的指令行为
YEMU 在 switch 的 default 部分写了一些逻辑。
未识别的指令,会打印Invalid instruction信息,更新halt = 1标识结束。
- 执行:
- 译码完成之后,执行部分使用 C 语言对寄存器和内存进行操作。如
R[rt] =R[rs]
- 译码完成之后,执行部分使用 C 语言对寄存器和内存进行操作。如
- 更新 PC
- 要做到章节标题中的[[#不停计算的机器]]我们需要更新 PC。
- 在未涉及到主动跳转的情况下,我们 simply do
pc ++
这两者有什么联系?
状态机的转换实际是由我们执行指令这个行为所激励着的。在执行一条指令的时候,我们完成了更新状态(包括寄存器、内存、PC)的操作,更新 PC 则同时为下一条指令的执行做好了准备(装入内存中对应指令。)状态机就这样周而复始的运作下去了。
RTFSC (2)
RTFSC 理解 NEMU 指令执行的过程
1 | // nemu/src/cpu/cpu-exec.c |
本函数创建了一个结构体 Decode s 作为解码指令的结构。其包含了 pc, snpc, dnpc 和 isa 的信息。
execute(uint64_t n) 的 n 代表执行多少条指令的意思。
对于每一条指令:
1 | static void exec_once(Decode *s, vaddr_t pc) { |
这里有一个有趣的问题
编译与链接 1
尝试去掉 static 和 inline 试试?
在
nemu/include/cpu/ifetch.h中, 你会看到由static inline开头定义的inst_fetch()函数. 分别尝试去掉static, 去掉inline或去掉两者, 然后重新进行编译, 你可能会看到发生错误. 请分别解释为什么这些错误会发生/不发生? 你有办法证明你的想法吗?
去掉各一个不会报错,去掉两者会报错。
2
inst.c:(.text+0x1600): multiple definition of `inst_fetch'; /home/zhu/nju-pa/nemu/build/obj-riscv32-nemu-interpreter/src/engine/interpreter/hostcall.o:hostcall.c:(.text+0x0): first defined here多个包含了
ifetch的.c文件,发生了多定义问题。
首先要理解include的本质就是把该.h文件复制到include的部分。
inline作为内联关键字,其在所有引用ifetch的部分会替换为这部分文字,所以不涉及重复定义问题
而static声明了ifetch的链接属性为internal linkage,它仅在当前源文件 (translation unit) 中可见,所以不会被其他文件引用到。
可以理解为每个文件都持有了一个互不干扰的副本(生成目标文件时候不会导出符号)
完成取指令之后就要开始译码了
1 | static int decode_exec(Decode *s) { |
这个函数很巧妙的利用宏完成了指令的解码。不同类型的立即数获取和寄存器获取(寄存器值获取对于 riscv32 是指令类型无关的)都有相对应的函数接口。
解码了操作码之后,需要解码操作数
1 |
|
在获取操作数之后,在 decode_exec 中将进行对应的寄存器和内存和 pc 操作来改变程序的状态。并进入下一条指令执行。
额外的问题:程序是怎么装载到 NEMU 的?
nemu本身是一个monitor或者说debugger,是一个运行程序的程序。程序的装载发生在init_monitor函数中。在初始化了内存和 isa 和 trace 相关之后,他会执行init_monitor函数并load_image(NEMU提供了默认的image,如果image文件未指定会执行默认程序并在正常情况下hit good trap)
2
3
4
5
6
7
8
9
10
11
12
13
14
15
16
17
18
19
20
21
if (img_file == NULL) {
Log("No image is given. Use the default build-in image.");
return 4096; // built-in image size
}
FILE *fp = fopen(img_file, "rb");
Assert(fp, "Can not open '%s'", img_file);
fseek(fp, 0, SEEK_END);
long size = ftell(fp);
Log("The image is %s, size = %ld", img_file, size);
fseek(fp, 0, SEEK_SET);
int ret = fread(guest_to_host(RESET_VECTOR), size, 1, fp);
assert(ret == 1);
fclose(fp);
return size;
}很简单,我们读取
img_file,并一行一行把image里面的机器码指令读到 pc 的一行一行的位置中。
这里要理解 读到了哪里,要阅读如下的宏
2
3
4可以看到其实从
PC的起始位置开始读。其中CONFIG_PC_RESET_OFFSET可以在menuconfig修改,默认是0x0。注意字节序的转换。
关于立即数位数的理解
- 你可能有疑问,为什么
imm[11:0], imm[31:12]这样乱七八糟的?这代表什么意思?- 首先
index from 0. 比如B-Type,其没有规定最低位是多少,我们就默认其是0
- 这其实保证了分支目标一定是对齐到 2 字节(半字)的地址。
- 实际上 RV 32 I 是 4 字节对齐的。
- 所以不需要编码在指令里。(这节省了一部分空间!)
- 这就是为什么有的类型的立即数(比如 B-type)没有
imm[0]的编码位置- 然后,
RISC-V为了能统一字长,做出了这个设计。这样,imm立即数通过存储在不同的段来达到更好的兼容性。- 所以,例如
J-Type,31bit处存储的数值应该左移20位,再和30-21存储的 bit 左移1位… 取或得到最终的结果
Similarly, the only difference between the U and J formats is that the 20-bit immediate is shifted left by 12 bits to form U immediates and by 1 bit to form J immediates.
运行第一个 C 程序
这个程序是 dummy
有趣的别名
- 有趣的是,如果你去读
nemu-log.txt,你会发现和编译器给出的命令名不一样:
0x80000000: 00 00 04 13 mv s0, zero
zero寄存器是 RISC-V 体系一个特殊的寄存器,值永远是0li实际是 load immediate 的意思mv也是一个别名和li一样,(伪指令),是assembler为了让代码更易读取的别名。mv rd rs会把rs的值复制到rd中mv s0 zero即把s0寄存器清零。mv rd, rs=addi rd, rs, 0
这其实也是一道题
AT&T 格式反汇编结果中的少量指令, 与手册中列出的指令名称不符, 如 x 86 的
cltd, mips 32 和 riscv 32 则有不少伪指令 (pseudo instruction). 除了 STFW 之外, 你有办法在手册中找到对应的指令吗? 如果有的话, 为什么这个办法是有效的呢?
- 你可以通过阅读机器码,来对照出来真正的指令。当然这个效率较低。
- 这个办法一定有效,因为基本指令的操作码是不会有交叉的。
仔细查阅手册,工程化的工作就能完成不同汇编指令, 并 PASS 所有指令。
- But it’s only easy saying so…
- Still bugs awaits, but diff-test may be your best friend
程序,运行时环境与 AM
这一部分需要提供运行时环境的支持。具体我们是在 abstract-machine 中实现的。
AM 是软件层面的,他提供了进一步的抽象,为在 NEMU 上运行的程序提供更方便的接口。
通过批处理模式运行 NEMU (理解 Makefile)
理解 Makefile
这是阅读 Makefile 的奖励。
在 abstract-machine/Makefile
1 | ### Paste in arch-specific configurations (e.g., from `scripts/x86_64-qemu.mk`) |
可见我们会自动包含对应的 .mk
我们在 am-kernels 的 cpu-test 中的 Makefile 理解发生的一切
我们试图批处理输入的命令实际是:
1 | make ARCH=$ISA-nemu run |
对于一个 Makefile 文件,ARCH=riscv32-nemu 实际是一个命令行变量。也就是会覆写 Makefile 中的这个变量。
1 | # am-kernels/tests/cpu-tests/Makefile |
其 include 了 AM_HOME/Makefile, 也就是真正的 abstract-machine 的构建规则。所以每个测试的 Makefile 实际是为每个 C 程序做一个执行的入口副本。
我们来拆解一下这行:
@/bin/echo -e "NAME = $*\nSRCS = $<\ninclude $${AM_HOME}/Makefile" > $@
这行命令会生成一个临时的 Makefile 文件(例如 Makefile.add, Makefile.sub 等),每个测试源文件对应一个这样的文件。我们来看它的内容。
假设当前的测试文件是 tests/dummy.c,
那么这条规则展开后会生成 Makefile.dummy,
NAME = dummy SRCS = tests/dummy.c include $(AM_HOME)/Makefile
也就是说,每个测试对应一个独立的小型 Makefile,它会通过 include 指令引入一个更通用的 Makefile 模板。
这一行告诉 GNU Make:
把环境变量
AM_HOME路径下的Makefile文件内容包含进来,
就像直接写在当前 Makefile 里一样。
也就是说,真正的构建逻辑(比如编译规则、链接规则、运行方式)都写在 $(AM_HOME)/Makefile 中,
而这里的主 Makefile 只是:
- 遍历
tests/*.c - 为每个测试生成一个包含公共模板的独立 Makefile
- 调用
make -f Makefile.xxx ...执行测试
接下来回看 abstract-machine/Makefile
1 | # ... |
其会根据架构来包含执行不同的 mk 脚本。
按图索骥,查询 $(AM_HOME)/scripts/*.mk)
1 | # $(AM_HOME)/scripts/*.mk) |
再去查询其引用的 $AM_HOME/scripts/platform/nemu.mk
1 | CFLAGS += -fdata-sections -ffunction-sections |
这里 NEMUFLAGS 就是我们要增加的一行语句。
でも、これは足りない.
这个 NEMUFLAGS 是如何让 nemu 认识到的?
先来总结一下 Makefile 从测试到生成可执行文件的链条
2
3
4
5
6
7
8
9
10
11
12
│
├── 顶层 tests/Makefile → 生成 Makefile.xxx 并调用
│
├── $(AM_HOME)/Makefile → 编译 + 链接 + include $(AM_HOME)/scripts/riscv32-nemu.mk
│
├── $(AM_HOME)/scripts/riscv32-nemu.mk
│ ├── include isa/riscv.mk (定义 ISA)
│ └── include platform/nemu.mk(定义 run & NEMU_FLAGS)
│
└── platform/nemu.mk 中定义 run:
$(NEMU) $(NEMU_FLAGS) $(IMAGE)
有趣的是:在这之后,nemu.mk 将会把"控制权"转交给铁驭nemu 处的 make
1 | # abstract-machine/scripts/platform/nemu.mk |
其通过 $NEMU_HOME 处递归的进行 make,同时把 NEMUFLAGS(还记得吗?)作为编译参数.
$(MAKE) -C 是什么?
$(MAKE)就是当前使用的 make 程序;-C $(NEMU_HOME)表示切换工作目录到$(NEMU_HOME)再执行 make;- 所以这行命令等价于在终端手动执行:
cd $(NEMU_HOME) make run ISA=$(ISA) ARGS="$(NEMUFLAGS)" IMG=$(IMAGE).bin
怎么作为的编译参数呢?
1 | nemu/scripts/native.mk |
这里的 NEMU_EXEC 是一个简记法,这里就可以看出其用了 ARGS,而 Makefile 语言会把命令行参数当全局变量(也就是前面我们在 AM 层写入了 ARGS += NEMUFLAGS),所以你的 nemu 知道了这个编译参数!其运行可执行二进制文件的时候,就会加上这个参数,还有 IMG 的文件路径。
你说得对,但我 gcc 命令去哪了?
你总得用编译器对吧?
nemu 对编译器的设定也要提供多 ISA 的支持,所以使用何种编译器和编译选项也是写在不同脚本里的。
从 .c 到 .o 的规则
这里可以阅读 nemu/scripts
1 | # nemu/scripts/build.mk |
这就是编译阶段执行 gcc 的地方, 其中你还可以看到一些编译选项 Werror 等。
总结 NEMU 的编译链
1 | make run |
接下来我们再回到一个 make 指令干了什么,by input make run -n at $NEMU_HOME
1 | **make run -n** |
是的,如果你输入 $NEMU_HOME/build/riscv32-nemu-interpreter 你会发现一个 NEMU 真的被你启动了! 这其实就是复杂的 make run 链条做的事情。
如果你 make clean 之后再输入 make run -n,你看到的将是长得多的展开指令,包括编译,链接,生成等过程。
在 NEMU 层面
而在 NEMU 程序层面,其获得参数是解析 args 实现的
1 | static int parse_args(int argc, char *argv[]) { |
这里就有批处理的处理。
- 之后的
elf也在这里哦
你大致理解了 Makefile 的组织, 起码从如何加入批处理上
恭喜你!
きぼうのみちを、じぐざぐすすもう! – Toyama kasumi
实现字符串相关处理函数
参考库函数行为即可。
实现 sprintf
阅读手册就可以实现。
为了避免 parse-programming 的危害,抽象一个中间函数 vsprintf
基础设施
我个人将各类 trace 几乎都放在 src/utils/itrace.c 中
itrace
我们实现一个环形存储来打印出错之前的一部分指令。
模环 很方便做到这一点。
1 | typedef struct |
动态维护 push 和 pop 一个 ItraceRingBuf 即可。
mtrace
直接在访存位置打印即可(paddr_read 和 paddr_write)
ftrace
这个值得好好说道说道
RTFM byman 5 elf
一个典型的 elf 文件组织
1 | +-------------------+ |
如何判别 elf
1 | ELF header (Ehdr) |
elf 文件提供了魔数,即一个数组 e_ident,它的前几个字节是固定的:
1 | // elf.h |
故可以通过内存检测的办法,打开一个 elf 文件,检测其 e_ident 的内存是否等于 ELFMAG(在长度 SELFMAG 意义),具体来说可以用这个 C 语句
1 | if (memcmp(elf_header.e_ident, ELFMAG, SELFMAG) != 0) { |
同时,elf header 还有一个定义了表头的大小的成员 elf section header entry size, e_shentsize。
1 | e_shentsize |
如何找到符号表?
find the section header table
1 | e_phoff |
这是 ELF Header 的两个成员。分别定义了 program header table's file offset 和 section header table's file offset
我们暂时关心 section header,
通过 fseek(fp, e_shoff, SEEK_SET 我们可以把文件指针定位到 section 节。
find the 字符节
当我们已经到达 Section Table,接下来就是去找字符表部分或其他我们关心的部分
sh_offset
This member’s value holds the byte offset from the
beginning of the file to the first byte in the section.
One section type, SHT_NOBITS, occupies no space in the
file, and its sh_offset member locates the conceptual
placement in the file.
Section Header 有以下成员:
1 | typedef struct { |
其中
sh_type代表符号表类型-SHT_STRTABSHT_SYMTAB
- 我们可以通过
fread(str_table, sizeof(Elf32_Shdr), 1, fp)的方法,遍历section header table的所有表头,比对:strtab_header.sh_type == SHT_STRTAB,然后找到string table或其他想要的表
实际上,Section Header Table 中的不同表单 entry 是叠放在一起的结构体,他们的大小都是 sizeof(Elf32_Shdr)
1 | +---------------------------+ |
阅读符号表,对照字符表
我们实际需要找到这两个表。建议保存字符表为一个哈希表便于查找。
| 对象 | 文件段 | 内容 | 被谁引用 |
|---|---|---|---|
.shstrtab |
节名字符串表 | 各个 Section 的名字 | Section Header (sh_name) |
.strtab |
符号名字符串表 | 各个符号的名字 | 符号表项 (st_name) |
.symtab |
符号表 | 符号的地址、类型、大小 | 程序、链接器、调试器 |
.dynsym |
动态符号表 | 动态链接符号 | 动态链接器 |
在 符号表 中的偏移量大小,就可以对应的在 字符串表 找到其表达的字符串名字 |
// PA 的要求
现在我们就可以把一个给定的地址翻译成函数名了: 由于函数的范围是互不相交的, 我们可以逐项扫描符号表中Type属性为FUNC的每一个表项, 检查给出的地址是否落在区间[Value, Value + Size)内, 若是, 则根据表项中的Name属性在字符串表中找到相应的字符串, 作为函数名返回. 如果没有找到符合要求的符号表表项, 可以返回字符串"???", 不过这很可能是你的实现错误导致的, 你需要再次检查你的实现.
增加对 elf文件的支持
- 在
parse_arg()中增加对elf文件解析的内容 - 在
nemu.mk(abstract-machine/scripts/platform/nemu.mk)中增加参数-e的内容
1 | NEMUFLAGS += -l $(shell dirname $(IMAGE).elf)/nemu-log.txt |
从 gdb 可知道,实际是在运行 $ISA-interpreter 时候加上了这些参数
1 | (gdb) run |
需要特别注意的是, Unix 解析命令行的方法
1 |
|
所以,我们需要在 src/monitor/monitor.c 中的 parse_arg() 函数中增加一个 e:
: 表示这是个需要参数的选项。
Without it, you won’t get the
o. then your switch would not gete.
1 | while ( (o = getopt_long(argc, argv, "-bhl:d:p:e:", table, NULL)) != -1) { |
函数追踪功能的开启,我们定义他为一个宏 CONFIG_FTRACE,同样在 Kconfig 中修改,并在 make menuconfig 中进行设置
riscv 如何判别 call 和 ret?
首先明确一下寄存器结构:
RISC-V 架构提供了 32 个通用寄存器,编号为 x 0 到 x 31。每个寄存器都有特定的用途:
- x 0 (zero): 硬编码为 0,读出总是 0,写入无效。
- x 1 (ra): 返回地址寄存器,用于保存函数返回地址。
- x 2 (sp): 栈指针寄存器,指向栈的地址。
- x 3 (gp): 全局指针寄存器,用于链接器松弛优化。
- x 4 (tp): 线程指针寄存器,常用于保存指向进程控制块的指针。
- x 5-x 7, x 28-x 31 (t 0-t 6): 临时寄存器,用于存储临时数据。
- x 8 (s 0/fp): 帧指针寄存器,用于函数调用时保存数据。
- x 9 (s 1): 保存寄存器,用于函数调用时保存数据。
- x 10-x 17 (a 0-a 7): 用于函数调用,传递参数和返回值。
- x 18-x 27 (s 2-s 11): 保存寄存器,用于函数调用时保存数据。
From the view of code:
1 | const char* regs[] = |
对于 CALL
jal命令返回的地址应该存入x1(ra)中
1 | // in jal, jalr |
对于 RET
- 根据汇编器的记号,也可以推断出是
jalr x0, 0(ra)的别名 rd=x0- 不保存返回地址rs1 = ra(x1)- 从返回地址寄存器读取目标地址imm = 0偏移量为0
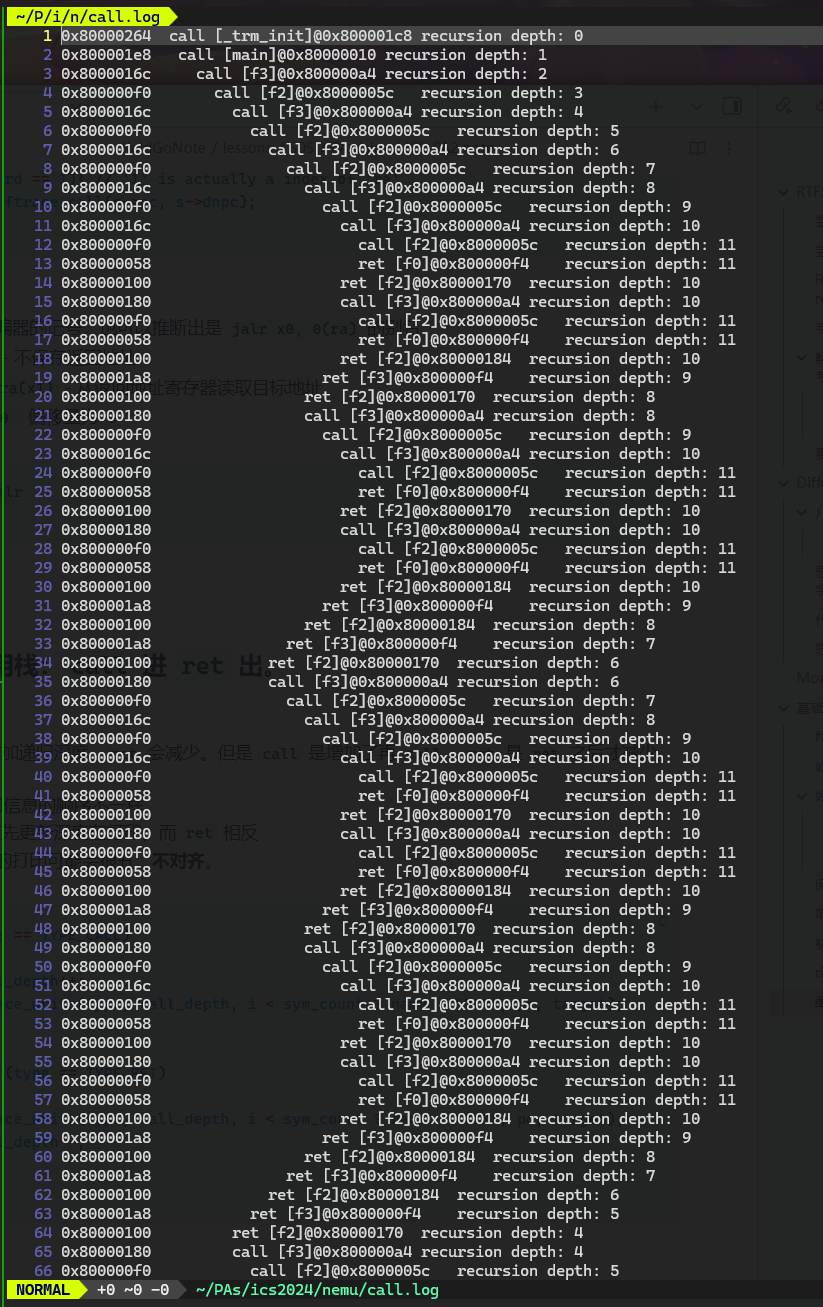
维护调用栈:call 进 ret 出。
一个细节:
call 会增加递归深度,ret 会减少。但是 call 是增加了再 call,ret 是 ret 之后才减少。
所以,打印信息的顺序不一样。
call 应该先更新深度在打印,而 ret 相反
- 否则你的打印可能会很丑,不对齐。
1 | if (type == TYPE_CALL) |
cputests/recurion.c
Difftest
这部分的实现:
1 | bool isa_difftest_checkregs(CPU_state *ref_r, vaddr_t pc) |
感激 Difftest 的理由
在跑
benchmark测试的时候,新实现了ori指令,这是一个I-type的但我手滑输入成了R导致imm解析不正确,coremark测试集hit bad trap而难以追踪。最后,使用Difftest,我迅速定位到了导致程序这个状态机(主要是寄存器存储值)不一样的指令ori,从而迅速解决了问题。(困扰了两个小时,再想到Difftest之后迎刃而解)
一键回归测试
记得经常回归测试!具体方案已经在预处理部分讲过了。
奇怪的错误码
为什么错误码是 1 呢? 你知道 make 程序是如何得到这个错误码的吗?
#TODO
IO
进行 hello 测试前,不要忘记在 menuconfig 中勾选 Device,否则 paddr.c 模块的 paddr_read() 和 paddr_write() 不能正确处理 addr 是物理内存还是设备空间。从而报错。
时钟
8253 计时器初始化时会分别注册 0x48 处长度为 8 个字节的端口, 以及 0xa0000048 处长度为 8 字节的 MMIO 空间, 它们都会映射到两个 32 位的 RTC 寄存器. CPU 可以访问这两个寄存器来获得用 64 位表示的当前时间.
1 | #define RTC_ADDR (DEVICE_BASE + 0x0000048) |
1 | // abstract-machine/am/src/paltform/nemu/include/nemu.h |
在 amstract-machine/am/include/amdev.h 为时钟定义了两个抽象寄存器
1 |
|
这是一个学习宏的好机会。
AM_##reg 的 ## 起到一个拼接的功能,会将字符串 "AM_" 和 reg 这个宏给定的参数连成一个新的标识符。
__VA_ARGS__; 则是所有可变宏参数的集合
1 | AM_DEVREG(1, UART_CONFIG, RD, bool present); |
am/src/platform/nemu/include/nemu.h 中有一些相关的输入输出函数可以使用
1 | // abstract-machine/am/src/$ISA/$ISA.h |
我们是 32 机,想获得 32 的地址,可以用 inl 这个函数。
如何进行 real-time clock test 测试?
这需要我们阅读源代码。
在/am-kernel/tests/am-tests/src/main.c中定义了测试的入口。
2
3
4
5
6
7
8
9
10
11
12
13
14
15
16
17
18
19
20
21
22
23
24
25
26
27
28
29
30
31
32
33
34
35
36
37
38
39
void (*entry)() = NULL; // mp entry
static const char *tests[256] = {
['h'] = "hello",
['H'] = "display this help message",
['i'] = "interrupt/yield test",
['d'] = "scan devices",
['m'] = "multiprocessor test",
['t'] = "real-time clock test",
['k'] = "readkey test",
['v'] = "display test",
['a'] = "audio test",
['p'] = "x86 virtual memory test",
};
int main(const char *args) {
switch (args[0]) {
CASE('h', hello);
CASE('i', hello_intr, IOE, CTE(simple_trap));
CASE('d', devscan, IOE);
CASE('m', mp_print, MPE);
CASE('t', rtc_test, IOE);
CASE('k', keyboard_test, IOE);
CASE('v', video_test, IOE);
CASE('a', audio_test, IOE);
CASE('p', vm_test, CTE(vm_handler), VME(simple_pgalloc, simple_pgfree));
case 'H':
default:
printf("Usage: make run mainargs=*\n");
for (int ch = 0; ch < 256; ch++) {
if (tests[ch]) {
printf(" %c: %s\n", ch, tests[ch]);
}
}
}
return 0;
}可见我们需要这样一个参数输入给 main 函数, 如果要执行
real-time clock test。
由此,我们再阅读am-kernel/tests/am-tests中的Makefile综上所述,你可以用类似这样的命令运行不同的
am_test:
- 该命令会运行
hellotest
运行 rtc_test 之后,我们来用 ftrace 看看调用栈。
1 | 0x80001044 call [_trm_init]@0x80000e4c |
该程序就是不断的调用 rtc_test,最终调用到 __am_timer_uptime 来更新信息的。
yzh 先生埋得雷
根据 pa manuel 和群友讨论,先更新低位或者高位似乎会影响跑分结果,这是 yzh 老师对大家的考验。
__am_timer_uptime 是怎么调用 nemu 这个系统来获得时间的?
我们在
am层的访存最后也会翻译成机器指令交给nemu执行,
可以看一下__am_timer_uptime,其访问时钟本质也是访存,用的是inl
2
3
static inline uint32_t inl(uintptr_t addr)
{ return *(volatile uint32_t *)addr; }这里我们使用
volatile关键字避免 编辑器优化,其实也是保证nemu能够执行我们想要的访存命令。所以
lw,lb,lh等访存指令中有相关的信息。继续阅读nemu代码上述翻译成机器代码,对时钟的访问则被
lw出发paddr_read,同时检测到是一个DEVICE就去DEVICE的内存空间 (mmio_read) 访问相应的设备(通过map_read)
那么,我们访问到时钟,就会触发回调函数。对于时钟来说就是下面的rtc_io_handler
2
3
4
5
6
7
8
9
10
// nemu/src/device/timer.c
static void rtc_io_handler(uint32_t offset, int len, bool is_write) {
assert(offset == 0 || offset == 4);
if (!is_write && offset == 4) {
uint64_t us = get_time();
rtc_port_base[0] = (uint32_t)us;
rtc_port_base[1] = us >> 32;
}
}所以,如果先更新低位,则
offset==0,则get_time不会被执行,从而导致跑分异常(你的低位时间获取的是上一次的低位,而不是系统时间)。
解决方案可以是先更新高位,或者把offset == 4改为offset == 0并保留原来的先更新低位。
总结一下
现在
nemu作为我们的系统,其会运行我们写的am层中的程序,阅读代码理解两方面的行为,合理使用ftrace和汇编代码等工具是很有必要的。

- 正常运行了。
如果你的实现正确, 你将会看到程序每隔 1 秒往终端输出一行信息. 由于我们没有实现
AM_TIMER_RTC, 测试总是输出 1900 年 0 月 0 日 0 时 0 分 0 秒, 这属于正常行为, 可以忽略.
跑分测试
-
在
Aliyun - Ubuntu 22.04, 2g 2核上跑分结果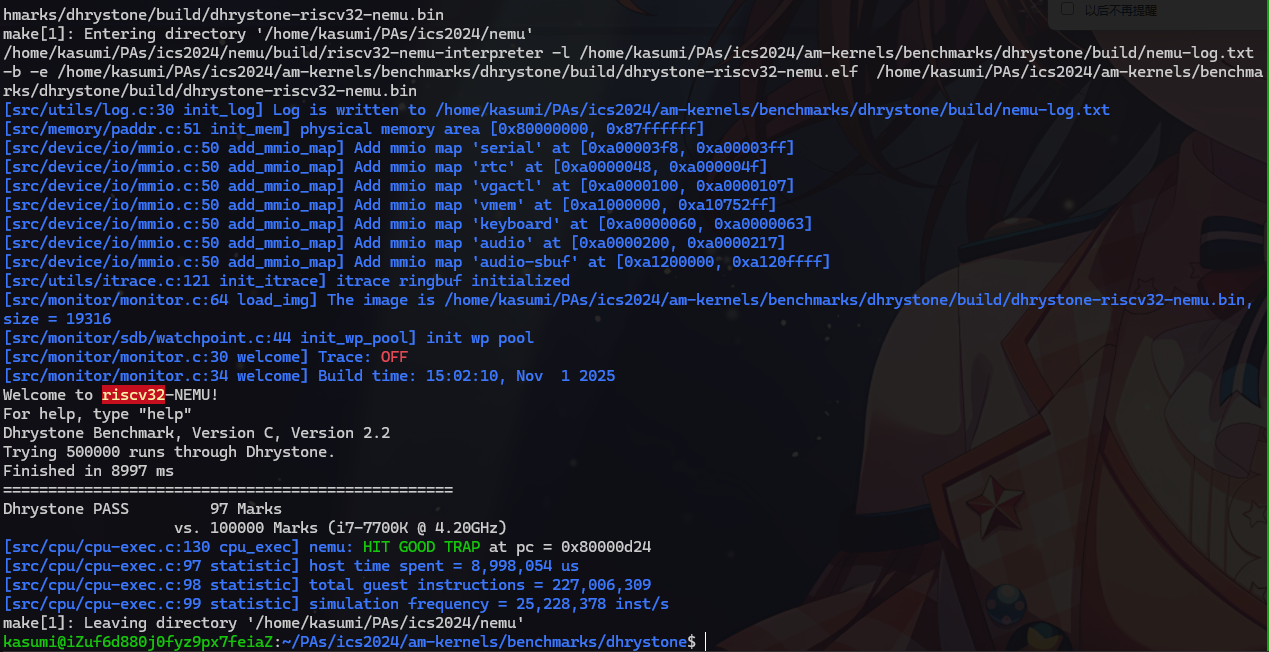
- 阿里云学生服务器的配置比较拉胯,跑分 97 应当是正确的结果。
- 克隆项目到
Ubuntu虚拟机测试
-
microbench
**现在我们把 am-kernels/kernels/demo/include/io.h**中的 HAS_GUI 注释掉了,来看字符版本的 Bad Apple 吧!
am 层的 malloc 函数
阅读 elf 表可以发现 mario 频繁地调用了
malloc函数。而我发生了访存错误,并且访存错误恰好是init_mem分配的0 x 80000000 - 0 x 8 fffffff的后一个字节。思考可能是我的malloc动了不该动的heap. end导致内存异常。
修改后,果然正常运行了mario。
malloc在 am 层的本质是让 nemu 划分一部分内存给am使用。这里我们只是声明了一段地址归这个malloc所有,并将malloc使用过的地址位置维护一下。
键盘
nemu 中提供了对键盘的解读,这需要我们在 am 层维护队 keyboard 信息的维护,我们通过 inl 函数去调用 nemu 上的访问设备的函数,从而得到系统上 keyboard 的信息。
理解这一点,可能还要阅读一点 sdl 和 keyboard 相关的东西
VGA
VGA 初始化时注册了从 0 xa 1000000 开始的一段用于映射到 video memory (显存, 也叫 frame buffer, 帧缓冲) 的 MMIO 空间.
我们通过 RGB 来显示颜色。
1 |
还记得 EasyX 的画图吗?每个像素管理后,你还需要 flush 一下。这里我们通过 sync 信号在 am 和 nemu 之间沟通画面的刷新。
展示你的计算机系统
理解打字小游戏如何运行
打字小游戏如何运行?
- 附打字小游戏运行图。在阿里云服务器运行
xrcp+xrdp。 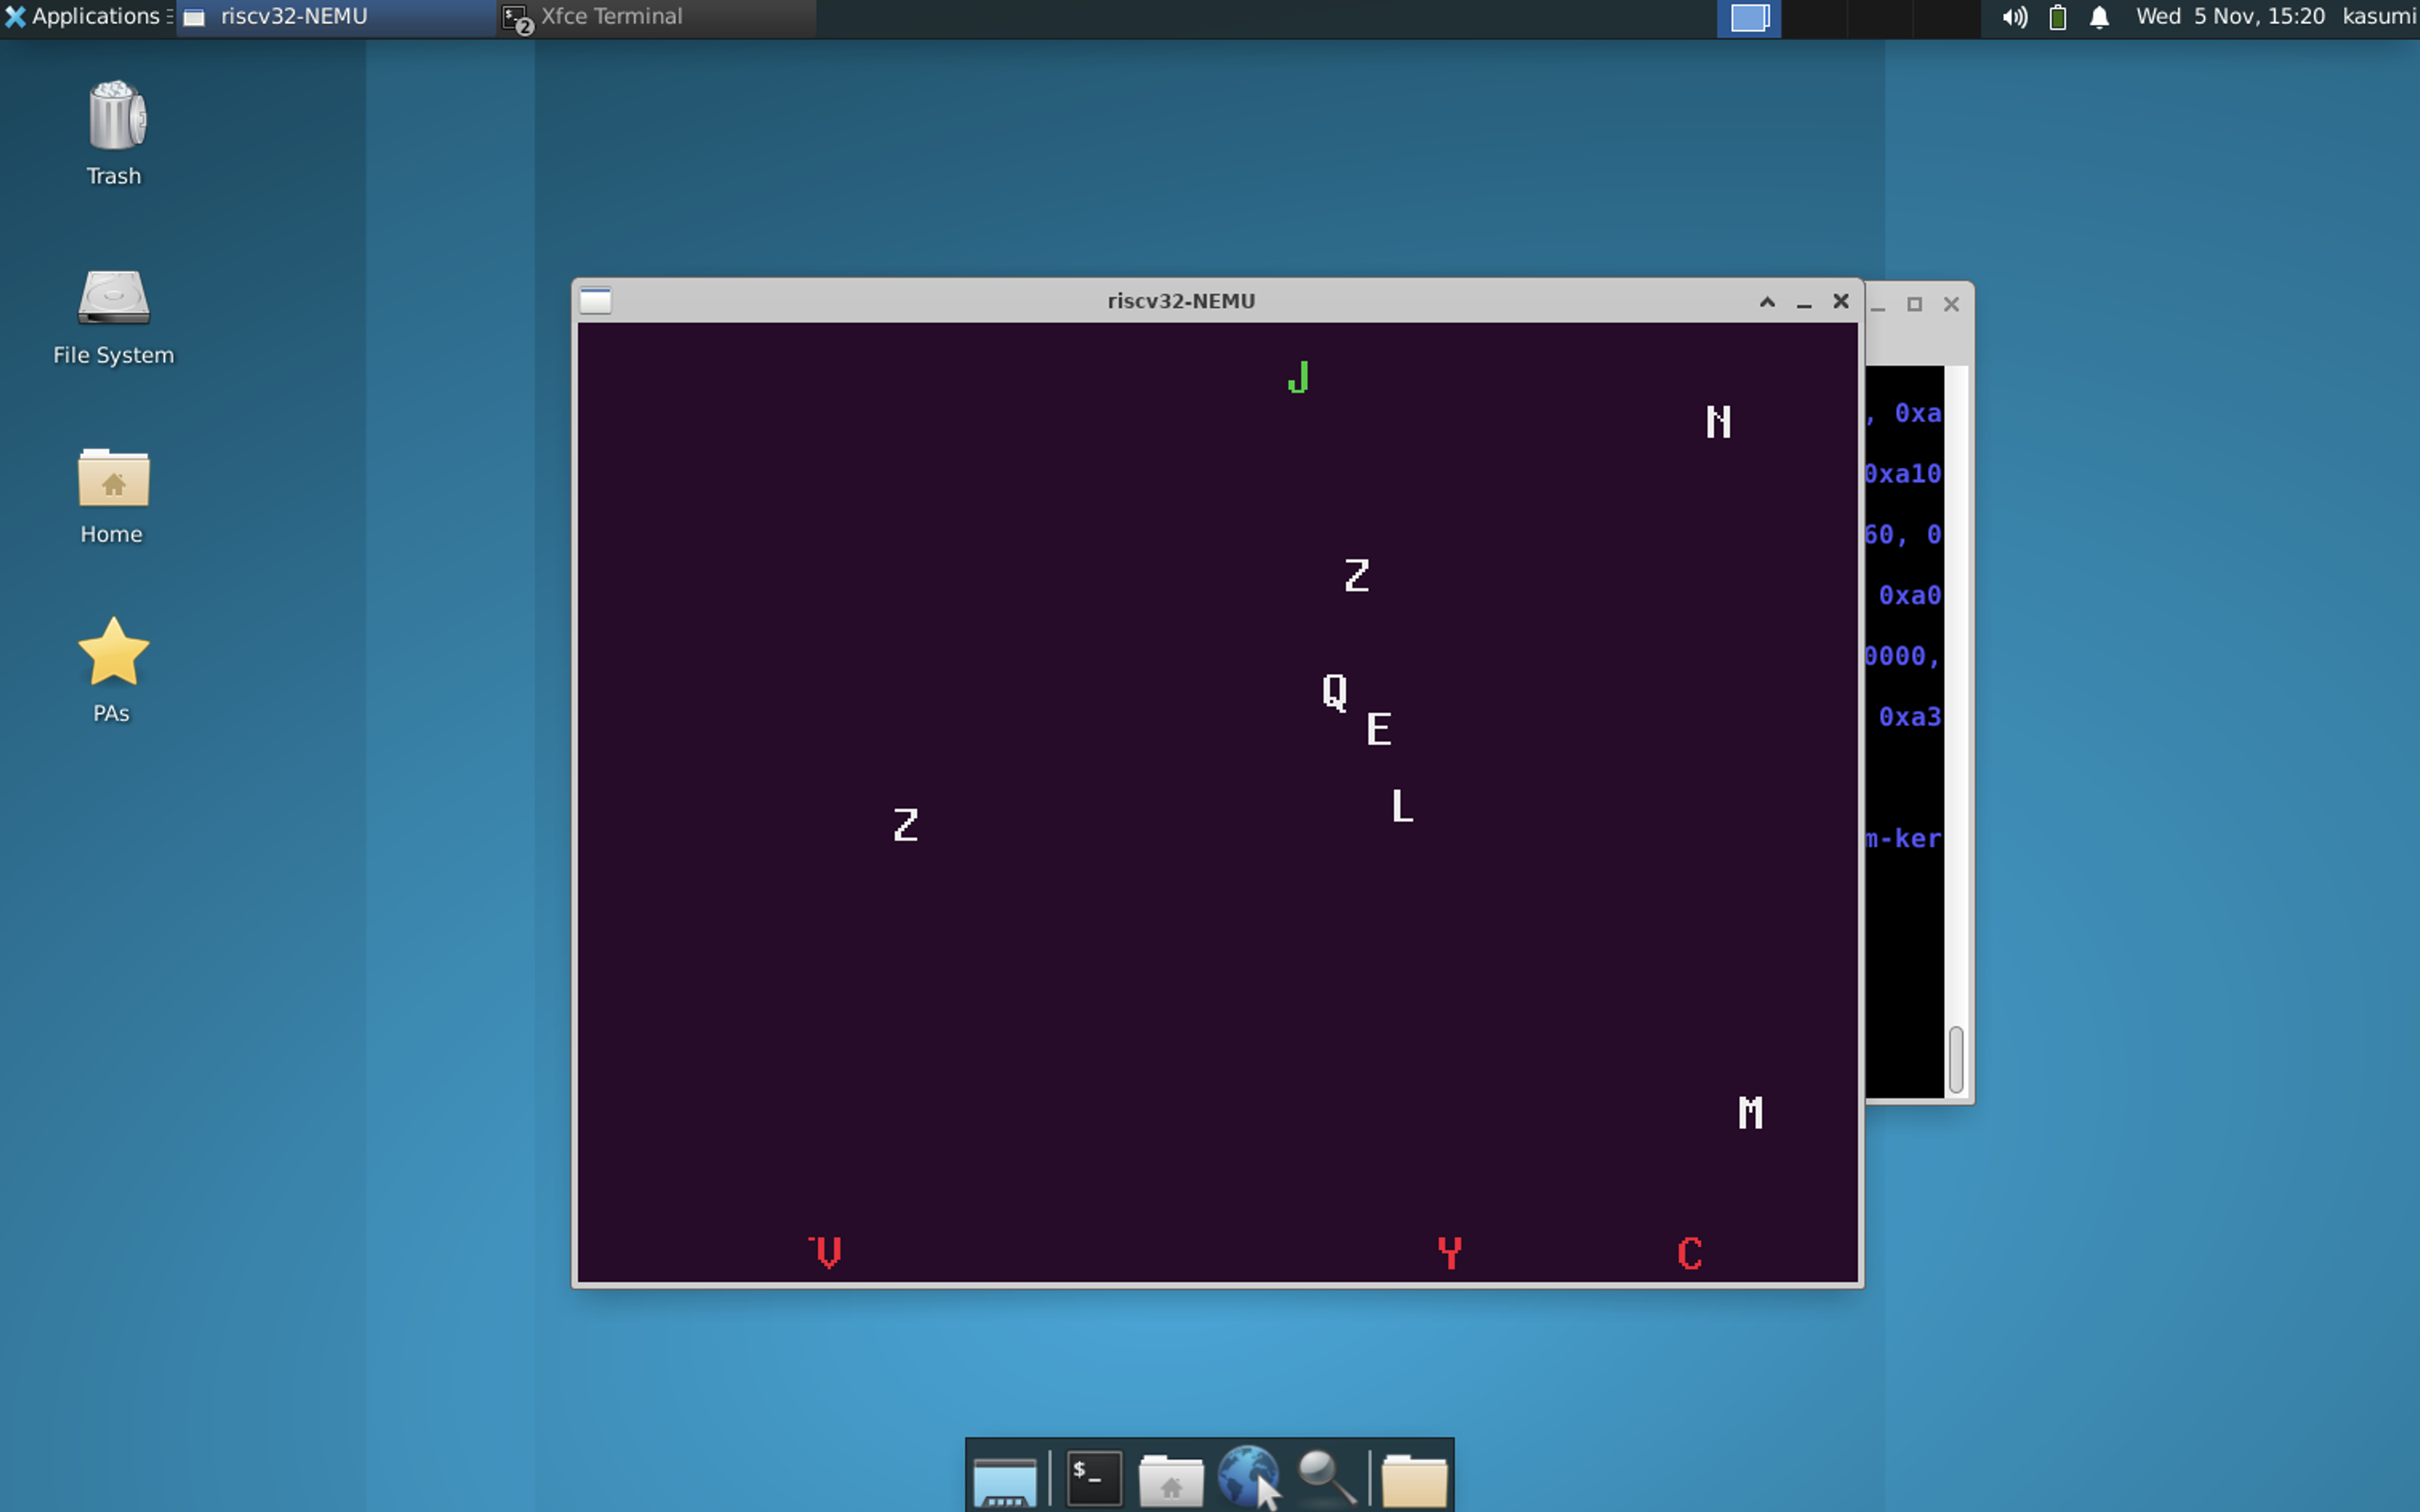
从微观角度:- 程序是个状态机
从宏观角度: - 计算机是个抽象层
打字小游戏的运行有这么几个要素要理解:
- 如何检测按键行为?
- 如何做出对按键行为的反应?
- 如何将这种反应输出到画面展示的?
typing-game 的主程序 game. c 首先调用 ioe_init () 函数初始化了 timer, gpu, audio (not implement yet),然后调用 video_init () 初始化画面。
然后游戏进入主循环。
FPS= frames per second, so int frames = (io_read (AM_TIMER_UPTIME). us - t 0) / (1000000 / FPS);
然后进入游戏更新逻辑的地方:
1 | void game_logic_update (int frame) { |
这里的每个字母是一个结构体:x, y 即坐标,ch 即其字母,是随机生成的。t 应该是每个字母的存活时间,默认为 0,在掉落 miss 后字母会存活原地 30 FPS 再离去。 v 是字母的运动速度
游戏更新逻辑:
- 检测是否需要产生新字母
CPS: it may refer to Char Per Second, soFPS / CPSis frames per char is generated
- 更新字母逻辑
- 更新字母位置:主要是按速度移动,
c->y += c->v - 如果字母掉落仍未被键盘出发带走,则记录
miss次数,并让字母在一个FPS内消失(这么说有点疑惑,实际表现就是一秒)
- 更新字母位置:主要是按速度移动,
- 操作逻辑
- 游戏逻辑更新后
1 | while (1) { |
其在我们 am 中定义的 AM_INPUT_KEYBRD 虚拟寄存器(实际指向 nemu 规定的键盘对应的内存空间)中获得键盘操作信息
- 如果是
esc,就退出游戏,byhalt (0) - 如果这是一个字母
ev. keydown && lut[ev. keycode]- 则检测是不是 hit 到了我们的游戏中的字母
check_hit (lut[ev. keycode]) - 该函数遍历了
chars即游戏中的字母。通过检测其速度是否大于0(有效的游戏字母)且是最靠近最底下的字母((m < 0 || c->y > chars[m]. y))来找到要被我们打字 弹 回去的字母 - 如果没找到,就说明我们打错字了 ,
if (m==-1) wrong++ - 否则
hit++,并让这个字飞回去。改个速度就行了。 chars[m]. v = -(screen_h - CHAR_H + 1) / (FPS);
- 则检测是不是 hit 到了我们的游戏中的字母
这就是从微观层面,该游戏程序的状态转移过程。其每个状态在程序层面可以编码为 <frames, <the state of chars[NCHAR]>>,我们通过时钟更新 frames,并在不同帧位置生成字母,再加上通过检测键盘输入作为外部激励,改变字母的状态。
输出到画面的函数相对简单:
1 | void render () { |
就是对 FBDRAW 缓存区的画面写入。正常下降字母速度大于 0 为白色,上升的字母是正确的就是绿色,否则为红色
字体文件在另一个 font. c
从宏观上看,AM 层(Abstract Machine)负责游戏源码层面的硬件抽象设计。游戏程序并不直接访问具体硬件,而是通过 AM 提供的虚拟 ioe 接口(包括时钟、键盘、VGA 等)获取或写入数据。在 nemu 实际运行时,这些接口对应到一段模拟的内存区域,程序通过访问这段内存即可获得硬件状态。而这些内存中的数据,又是由底层通过 SDL 从宿主机(真机)的输入设备与显示系统中读取、同步得到的。
至于编译过程和最终执行到 nemu,可以参考[[#通过批处理模式运行 NEMU (理解 Makefile)|从批处理看Makefile组织]]
其他必答题
编译与链接 2
编译和链接
- 在
nemu/include/common. h中添加一行volatile static int dummy;然后重新编译 NEMU. 请问重新编译后的 NEMU 含有多少个dummy变量的实体? 你是如何得到这个结果的?- 添加上题中的代码后, 再在
nemu/include/debug. h中添加一行volatile static int dummy;然后重新编译 NEMU. 请问此时的 NEMU 含有多少个dummy变量的实体? 与上题中dummy变量实体数目进行比较, 并解释本题的结果.- 修改添加的代码, 为两处
dummy变量进行初始化:volatile static int dummy = 0;然后重新编译 NEMU. 你发现了什么问题? 为什么之前没有出现这样的问题? (回答完本题后可以删除添加的代码.)
-
- 添加
volatile后编译器不会优化, 理论上我们数出包含common. h的. c文件即可。 - 一个更保险的方法是直接阅读
elf符号表 nm -a build/riscv 32-nemu-interpreter | grep dummy会输出所有dummy
- 添加
1 | kasumi@iZuf6d880j0fyz9px7feiaZ :~/PAs/ics 2024/nemu$ nm -a build/riscv 32-nemu-interpreter | grep dummy |
- 这些
dummy前面的字母b代表变量位于BSS段,而不是全局可见符号,符合static定义。
nm -a build/riscv 32-nemu-interpreter | grep "b dummy" -c
output35
所以一共 35 个 dummy
- 添加上题中的代码后, 再在
nemu/include/debug. h中添加一行volatile static int dummy;然后重新编译 NEMU. 请问此时的 NEMU 含有多少个dummy变量的实体? 与上题中dummy变量实体数目进行比较, 并解释本题的结果.
干活!
添加后仍然是 35
1 | kasumi@iZuf6d880j0fyz9px7feiaZ :~/PAs/ics 2024/nemu$ nm -a build/riscv 32-nemu-interpreter | grep "b dummy" -c |
static→ 每个. c文件独立拥有一份;即编译单元内只有一个。- 多个头文件定义同名
static→ 在同一个编译单元中仍只算一份; - 所以从
common. h和debug. h各加一行不会翻倍。
- 修改添加的代码, 为两处
dummy变量进行初始化:volatile static int dummy = 0;然后重新编译 NEMU. 你发现了什么问题? 为什么之前没有出现这样的问题? (回答完本题后可以删除添加的代码.)
在同时包含了 common. h 和 debug. h 的 dummy 的编译单元发生了 redefinition error
1 | error: redefinition of ‘dummy’ |
Declaration and Definition (真是一对苦命鸳鸯)
This error is actually because the difference between Declaration and Definition
When you write downvolatile static int dummy;, it’s a declaration, to tell the interpreter there is a static variabledummy, but no alloc store space, no initialize.
While, forvalatile static int dummy =0, it’s adefinition. When an interpret unit appear 2 definition for same-named static variable, a error caused.
声明 Declaration 是可重复的,定义则不可以。
了解 Makefile
了解 Makefile
请描述你在
am-kernels/kernels/hello/目录下敲入make ARCH=$ISA-nemu后,make程序如何组织. c 和. h 文件, 最终生成可执行文件am-kernels/kernels/hello/build/hello-$ISA-nemu. elf. (这个问题包括两个方面:Makefile的工作方式和编译链接的过程.)
我在[[#通过批处理模式运行 NEMU (理解 Makefile)|批处理部分]] 做的分析就可以回答这个问题, 其虽然在 cpu-tests 目录做的分析,但和 hello 只有多了一个 ioe 层的 . h, .c 组织的问题,并没有本质区别,这里不再赘述。
批处理部分